
Notebook
Python
Callback functions
TBC
Parameters in functions
TBC
Pandas
Round timestamp
# round the timestamp to min
df_plc['Time'] = df_plc['Time'].apply(lambda x: x.round('min'))
Timestamp resampling
Reference page is here.
# upsample a time series dataset. It is like group.
akeb_data = akeb_data.set_index('Time')
akeb_data_resample = akeb_data.resample('5T').ffill()
matplotlib
Add Chinese fonts in Matplotlib figures.
When I use matplotlib to generate pictures in Ubuntu, it sometimes cannot display Chinese characters. The solution is the method in this page. A short summary is below:
- use the following commands to check the fonts folder.
import matplotlib
matplotlib.matplotlib_fname()
In my environment, it gives the following location
/home/yang/Desktop/weight&food/weight/lib/python3.9/site-packages/matplotlib/mpl-data/matplotlibrc. This is a configuration file located in my local python virtual environment. - navigate to the folder
/home/yang/Desktop/weight&food/weight/lib/python3.9/ site-packages/matplotlib/mpl-data/fonts/ttf/and paste a new chinese font filesimhei.ttfto the folder. The font file can be found here. - edit the
matplotlibrcfile.- The line
#font.family: sans-serifshould be uncommented and changed tofont.family : sans-serif - The line
#font.sans-serifshould also be uncommented and add the new font ‘SimHei’ to it. It should be look like the following. ``` font.family : sans-serif font.sans-serif : SimHei, DejaVu Sans, Bitstream Vera Sans, Computer Modern Sans Serif, Lucida Grande, Verdana, Geneva, Lucid, Arial, Helvetica, Avant Garde, sans-serif
```
- The line
- Delete ~/.cache/matplotlib/
cd ~/.cache/ rm -rf matplotlib/ - restart the kernel
- when wanting to use Chinese font, using the following when drawing figures.
import matplotlib.pyplot as plt
if ifChinese == True:
     plt.rcParams['font.family'] = 'SimHei'
else:
     plt.rcParams['font.family'] = 'DejaVu Sans'

VPN
The tool is in Github. Their website is here. Use shadowsocks-libev. This tutorial is very helpful.
A VPS server
- Step 1: Installation
# install snap sudo dnf install -y epel-release sudo dnf update -y sudo dnf install -y snapd # enable snapd service sudo systemctl start snapd.service sudo systemctl enable snapd.service # install snap core sudo snap install core # install server side sudo snap install shadowsocks-libev # check info snap info shadowsocks-libev - Step 2: server configuration
- Make a new configuration file
touch /snap/bin/config.json - Open the new file and fill in the following information
{ "server":"0.0.0.0", "nameserver":"8.8.8.8", "server_port":8828, "local_port":1080, "password":"password", "method":"chacha20-ietf-poly1305", "timeout":600, "mode": "tcp_and_udp" } - In the VPS setting, allow the TCP and UTP traffic at port
8828 - Navigate to
cd /snap/bin/and it has the following files:config.json shadowsocks-libev.ss-redir newpid shadowsocks-libev.ss-server shadowsocks-libev.ss-local shadowsocks-libev.ss-tunnel shadowsocks-libev.ss-manager ss-server-pid - Can start the server with
shadowsocks-libev.ss-server -c config.json. However this method we must keep the terminal open. Otherwise, the server will stop after we close the terminal - Use
netstat -lptnto check the internet ports that are using. - NOTE The
nameserversetting is dependent on the location of the server and the purpose. For example, if the server is located in China, it is useless to set the name server as8.8.8.8, which is a Google DNS. Because the DNS server cannot be accessed anyway. In that case, it is better to set thenameserveras114.114.114.114, which is a Chinese domestic DNS server.
- Make a new configuration file
- Step 3: Use it as a service.
- Create a new file.
sudo touch /etc/systemd/system/shadowsocks-libev.service - Open the file and fill in the following contents.
[Unit] Description=Shadowsocks-Libev Server After=network-online.target [Service] Type=simple ExecStart=/usr/bin/snap run shadowsocks-libev.ss-server -c /snap/bin/config.json Restart=always RestartSec=2 [Install] WantedBy=multi-user.target - Start the server as a service
  # start the service
  sudo systemctl start shadowsocks-libev.service
  # enable auto start after rebooting
  sudo systemctl enable shadowsocks-libev.service
  # check the service
  systemctl status shadowsocks-libev.service
- Create a new file.
Install a client on an android phone.
Can either download from google play store or github release. Go in and make the configuration
Install a client on an android TV.
I have a android TV (Xiaomi Stick). It comes with Google play.
- Install the following apps from google play.
- X-plore File Manger. (To open json files, which will be used in vps client).
- Send files to TV. (Install both on mobile and android TV. To transfer files between mobile and android TV).
- Export the configuration file from phone client. It is named as
profiles.json. - Download the following apk files.
- Transfer the
profiles.jsonfile and the apk files to TV throughSend files to TV - Install the apk files.
- Open Shadowsocks client and choose
replace from filesand find the ‘profiles.json’ file. Then the server, port, and password will be updated. - Enjoy the TV side.
Use the service from a linux machine.
- install shadowsocks-libev on a local machine
- use
shadowsocks-libev.ss-localas the local client. Also need to make a configuration file. Check the following example.sudo touch /var/snap/shadowsocks-libev/common/client-config.json{ "server":"SERVER IP ADDRESS", "mode":"tcp_and_udp", "server_port":8828, "local_address":"127.0.0.1", "local_port":1080, "password":"password", "timeout":60, "name_server":"8.8.8.8", "method":"chacha20-ietf-poly1305" } - navigate to
cd /snap/bin/ - use
shadowsocks-libev.ss-local -c /var/snap/shadowsocks-libev/common/client-config.jsonto start the local client connection. NOTE Have tried to build the the json file/snap/bin/client-config.json. It comes with error Invalid config path. Not clear why. But might be problems of snap links. The folder/snap/bin/looks kind of special. - need to configure proxy for the application that we want to use. For example firefox
OpenWrt on Raspberry pi
OpenWrt is an open-source project for embedded operating system based on Linux. OpenWrt can be used as a Router system. Simply download the Firmware and burn it in a SD card. Raspberry pi can then boot and run OpenWrt. It has many functions.
Download firmware and burn it into SD card.
First check the version of Raspberry pi and different version of firmware at this link.
- Download the firmware from this Github repo. Please note that there are two types of file system (ext4 and quashfs). I used ext4 because this can be easily managed by Gparted. Please check the summry on this page.
- Use Etcher to burn the downloaded firmware into SD card.
- The default partition is very little, which cannot make full use of the SD card. Use this link to enlarge the size of the partition. It is very easy with Gparted on Linux system.
- Insert the SD card and boot.
RPi Configuration
- The initial IP address of the OpenWrt will be
192.168.1.1. This address needs to be revised before we can connect the RPi into our local network. This can be done by assigning a static IP to local computer. For example IP192.168.1.117and sub mask255.255.255.0. Connect the local PC with RPI and use browser to log into192.168.1.1. - A password will be need. The default setting is
password. - Once logged into the OpenWrt system, we can revise the settings of the ‘LAN’ port. Assign a new static IP address to avoid collision with Router. The gateway of RPi should be the address of main router. In this case, it will be
192.168.1.1. Uncheck the DHCP service in OpenWRT. Then Save and Exit. - Unplug the RPi from PC and connect directly to Router.
- Now the RPi can be accessed from any device in the same local network.

A problem about firmware
I have two RPi. One model 2b and one model 4. On model 2b I installed “openwrt-bcm27xx-bcm2709-rpi-2-ext4-factory.img.gz” and on model 4 I installed “openwrt-bcm27xx-bcm2711-rpi-4-squashfs-factory”. They differ in the file system. However, I found that it is very difficult to save configurations in Model 4 with the ‘squashfs’. It is almost impossible to save configurations. Not sure why. Will test the ext4.
The same problem reoccurs after a accident shutdown of rpi4. When using SSH to log in, it is noticed that we cannot make any changes to the files. It comes with the error read only file system. This happens to be a known problem, which is discussed here. The authors of the rpi firmware gives a solution. As far as I understand, this problem is caused by the SD card. The previous file installations still remain in the sd card. There is not a 100% formatting. The author proposed to rewrite the SD card by a blank image and then reburn the openwrt firmware. The problem is solved after doing so. For the sake of future use, I copied the blank image, and you can find it here.
RPi wifi setup
Follow the example given in the following picture. Be careful with banwidth as well as the location. The wifi might function not well if changing.

External wifi adapters did not function well due to lack of proper driver. This youtube video recommends one usb wifi adapter on Nano RS.
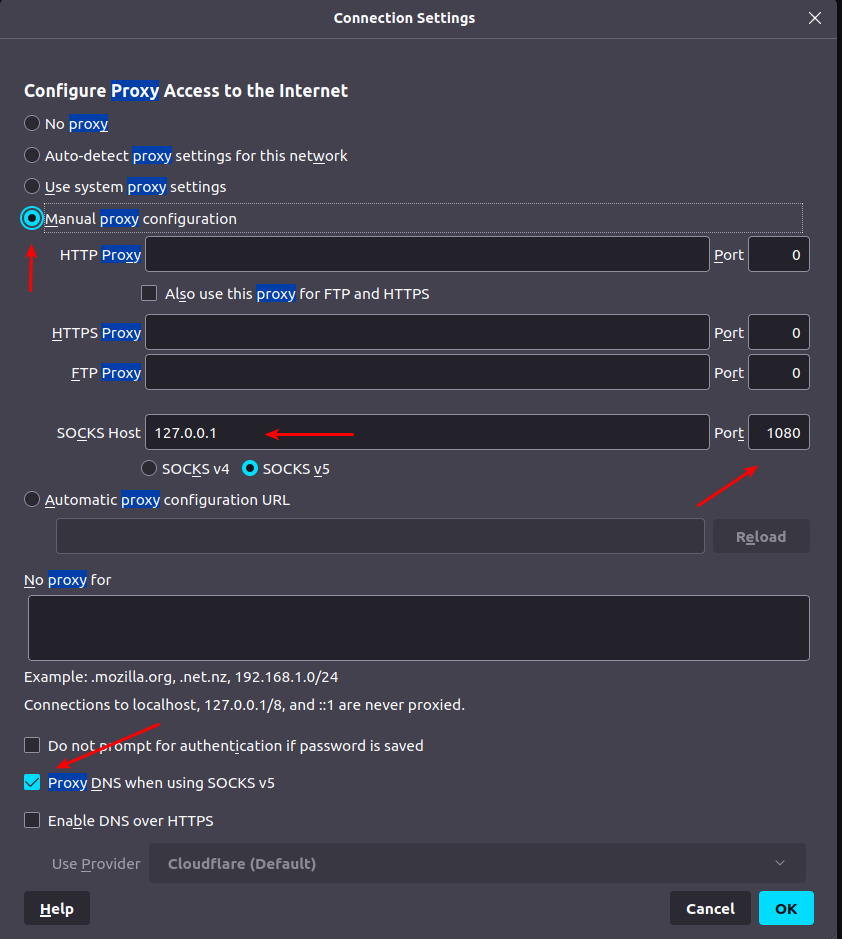
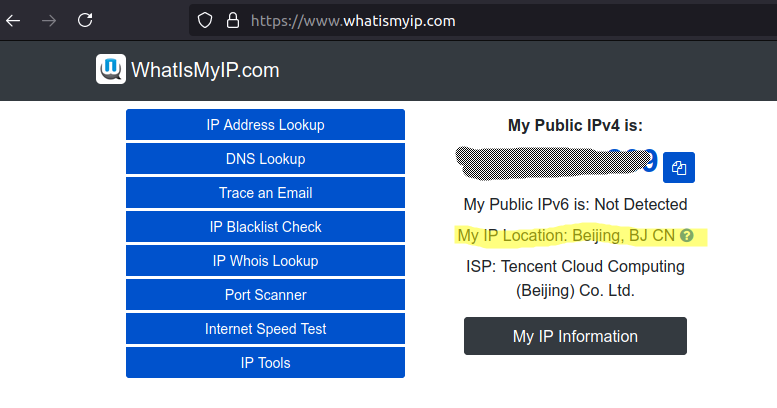
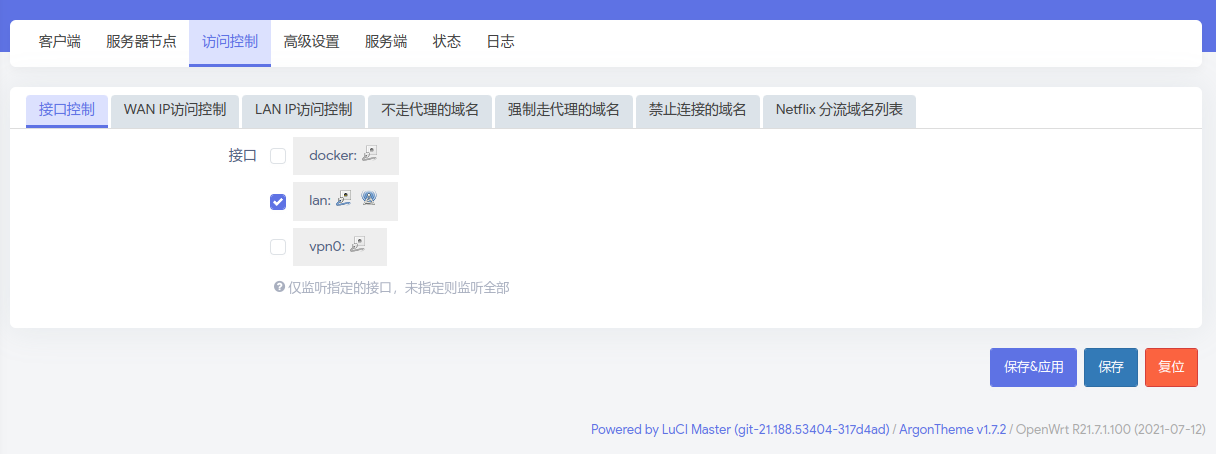
Configure the SS using SSR+ service.
Follow the following pictures. Add the server first.


Use the rpi to re-route traffic in other devices.
Let us assume rpi openwrt has the following IP address: 192.168.1.118
- Address: assign a IP address, for example 192.168.1.11
- Netmask: 255.255.255.0
- Gateway: 192.168.1.118
- DNS: 8.8.8.8